webpack2教程续之DllPlugin

本文承接webpack2教程webpack2教程续之自动编译以及webpack2教程续之eslint检测,本文所说的项目目录依旧是webpack2

在上三篇中,我们搭建了基于webpackvue开发环境,并且启动了监听文件修改自动打包编译,也支持了eslint语法检查,接下来,我们需要思考的是,那些公共的库是不是可以剥离出来单独打包,因为第三方库往往不需要经常打包更新。

对此,webpack的官方文档中出现了神器DllPligin点击此处查看文档。

Dll这个概念应该是借鉴了Windows系统的dll。一个dll包,就是一个纯纯的依赖库,它本身不能运行,是用来给你的app引用的。

打包dll的时候,Webpack会将所有包含的库做一个索引,写在一个manifest文件中,而引用dll的代码webpack.config.js在打包的时候,只需要读取这个manifest文件,就可以了。

为了查看效果,我在这里引入了一个第三方库,饿了么前端团队出品的基于 Vue.js 2.0 的后台组件库Element

调整下代码

main.js 中引入element

文件源码之 src/main.js

1
2
3
4
5
6
7
8
9
10
11
12
13
14
15
16
import Vue from 'vue'
import App from './App.vue'

// 引入Element
import ElementUI from 'element-ui'
import 'element-ui/lib/theme-default/index.css'

// 这里注释了之前引入的自定义css
// import 'src/css/app.less'
// import './css/app.css'

Vue.use(ElementUI)

new Vue({
render: h => h(App)
}).$mount('#app')

App.vue调用饿了么的组件,这里只是调用了下表格组件

文件源码之 src/App.vue

1
2
3
4
5
6
7
8
9
10
11
12
13
14
15
16
17
18
19
20
21
22
23
24
25
26
27
28
29
30
31
32
33
34
35
36
37
38
39
40
41
42
43
44
45
46
47
48
49
50
51
52
53
54
55
56
57
58
59
60
61
62
63
64
65
66
67
68
69
<template>
<div>
<h1 class="title">{{ msg }}</h1>
<h2 class="tips">{{ tips }}</h2>
<hr>
<div class="fengjing"></div>
<hr>
<!-- 调用表格组件 -->
<el-table
:data="tableData"
style="width: 100%">
<el-table-column
prop="date"
label="日期"
width="180">
</el-table-column>
<el-table-column
prop="name"
label="姓名"
width="180">
</el-table-column>
<el-table-column
prop="address"
label="地址">
</el-table-column>
</el-table>
</div>
</template>

<script>
export default {
data () {
return {
msg: 'Hello Vue!',
tips: '测试pm2的监控任务!',
tableData: [{
date: '2016-05-02',
name: '王小虎',
address: '上海市普陀区金沙江路 1518 弄'
}, {
date: '2016-05-04',
name: '王小虎',
address: '上海市普陀区金沙江路 1517 弄'
}, {
date: '2016-05-01',
name: '王小虎',
address: '上海市普陀区金沙江路 1519 弄'
}, {
date: '2016-05-03',
name: '王小虎',
address: '上海市普陀区金沙江路 1516 弄'
}]
}
},
methods: {
},
mounted () {
window.setTimeout(() => {
console.log('这是个1000ms后才显示的数据')
console.log('1111')
}, 1000)
}
}
</script>

<style lange="less">
/* 引用自定义的css */
@import './css/app.less';
</style>

手动执行webpack编译

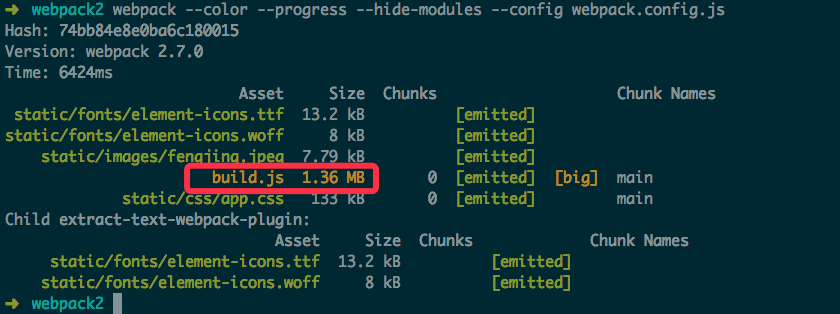
未配置DllPlugin的执行结果

请注意红色框标注的地方

接下来配置DllPlugin

根据官方文档,需要一个单独的webpack配置文件,这里命名为 webpack.dll.config.js

文件源码之 webpack.dll.config.js

1
2
3
4
5
6
7
8
9
10
11
12
13
14
15
16
17
18
19
20
21
22
23
24
25
26
27
28
// Package common library, like vue, element-ui etc.
const path = require('path');
const webpack = require('webpack');
// 这里将vue和element-ui单独打包
const vendors = ['vue', 'element-ui'];

module.exports = {
entry: {
vendor: vendors
},
output: {
path: path.join(__dirname, './dist/vendor/'),
filename: '[name].dll.js',
library: '[name]'
},
plugins: [
new webpack.optimize.UglifyJsPlugin({
compress: {
warnings: false
}
}),
new webpack.DllPlugin({
path: path.join(__dirname, './dist/vendor', '[name]-manifest.json'),
name: '[name]',
context: __dirname
})
]
};

webpack.DllPlugin的选项中,pathmanifest文件的输出路径
namedll暴露的对象名,要跟output.library保持一致
context是解析包路径的上下文,这个要跟接下来配置的webpack.config.js一致。

手动执行webpack编译

生成manifest文件

执行完毕将会生成vendor.dll.jsvendor-manifest.json,位于dist/vendor目录下

调整下webpack主配置文件webpack.config.js,在plugins选项中添加DllReferencePlugin

文件源码之 webpack.config.js

1
2
3
4
5
6
7
8
9
10
11
12
13
14
15
16
17
18
19
20
21
22
23
24
25
26
27
28
29
30
31
32
33
34
35
36
37
38
39
40
41
42
43
44
45
46
47
48
49
50
51
52
53
54
55
56
57
58
59
60
61
62
63
64
65
66
67
68
69
70
71
72
73
74
75
76
77
78
79
80
81
82
83
84
85
86
87
88
89
90
91
92
93
94
95
96
97
98
99
100
101
102
103
104
105
106
107
108
109
110
111
112
113
114
115
116
117
118
119
120
const path = require('path');
const webpack = require('webpack');
const ExtractTextPlugin = require('extract-text-webpack-plugin');

module.exports = {
devtool: 'eval',
entry: {
main: './src/main.js'
},
resolve: {
// 自动解析确定的扩展
extensions: ['.js', '.vue'],
// 告诉 webpack 解析模块时应该搜索的目录
modules: [
path.resolve(__dirname, 'src'),
'node_modules'
],
alias: {
'src': path.resolve(__dirname, './src')
}
},
output: {
// 打包输出的目录,这里是绝对路径,必选设置项
path: path.resolve(__dirname, './dist'),
// 资源基础路径
publicPath: '/dist/',
// 打包输出的文件名
filename: 'build.js'
},
module: {
rules: [
{
enforce: 'pre',
test: /\.js$/,
exclude: /node_modules/,
loader: 'eslint-loader',
options: {
cache: true,
formatter: require('eslint-friendly-formatter')
}
},
{
enforce: 'pre',
test: /\.vue$/,
loader: 'eslint-loader',
options: {
cache: true,
formatter: require('eslint-friendly-formatter')
}
},
{
test: /\.vue$/,
loader: 'vue-loader'
},
{
test: /\.js$/,
exclude: /node_modules/,
loader: 'babel-loader',
options: {
cacheDirectory: true
}
},
{
test: /\.css$/,
/*
use: [
'style-loader',
'css-loader'
]
*/
use: ExtractTextPlugin.extract({
fallback: 'style-loader',
use: 'css-loader?minimize'
})
},
{
test: /\.less$/,
use: ExtractTextPlugin.extract({
fallback: 'style-loader',
use: [
{ loader: "css-loader?minimize" },
{ loader: "less-loader" }
]
})
},
{
// 处理图片文件
test: /\.(png|jpe?g|gif|svg)(\?.*)?$/,
loader: 'url-loader',
options: {
limit: 7186, // inline base64 if <= 7K
name: 'static/images/[name].[ext]'
}
},
{
// 处理字体文件
test: /\.(woff2?|eot|ttf|otf)(\?.*)?$/,
loader: 'url-loader',
options: {
limit: 7186, // inline base64 if <= 7K
name: 'static/fonts/[name].[ext]'
}
}
]
},
plugins: [
// https://doc.webpack-china.org/plugins/uglifyjs-webpack-plugin/
new webpack.optimize.UglifyJsPlugin({
compress: {
warnings: false
}
}),
new ExtractTextPlugin({ filename: 'static/css/app.css', allChunks: true }),
// 添加DllPlugin
new webpack.DllReferencePlugin({
context: __dirname,
manifest: require('./dist/vendor/vendor-manifest.json'),
})
]
}

手动执行webpack编译

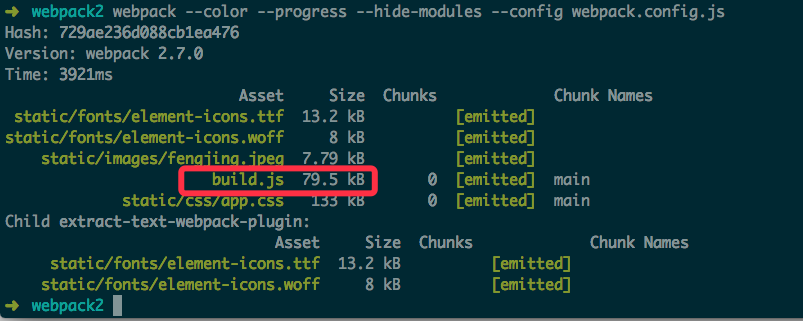
加入DllPlugin编译

这时候会发现build.js瞬间变小了

One more thing

这个时候主模版需要引用vendor.dll.js之后再引用build.js

文件源码之 index.html

1
2
3
4
5
6
7
8
9
10
11
12
13
14
<!DOCTYPE html>
<html lang="en">
<head>
<meta charset="utf-8">
<title>vue build by webpack2.</title>
<link rel="stylesheet" href="./dist/static/css/app.css" media="all">
</head>
<body>
<div id="app"></div>
<!-- 需要先引用 -->
<script src="./dist/vendor/vendor.dll.js"></script>
<script src="./dist/build.js"></script>
</body>
</html>